View Controller Transitions
Prior to iOS7, transitions between view controllers was not supported by SDK and we were able to create those transitions via custom UIViewAnimations. Beside this, making those transitions interactive was another painful task.
Now we have a nice API for controlling the animation between view controllers. The API heavily consists of delegate pattern and protocols. The generic work principle of the new API can be explained as:
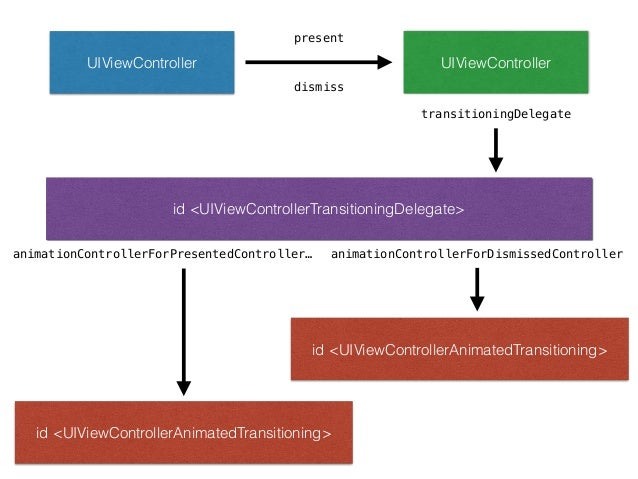
- When you present a view controller, UIKit looks for the transitioningDelegate for that View Controller.
- If that delegate is not empty, UIKit retrieves the animation controller, which is responsible for the transition between view controllers. transitioningDelegate methods look like this:
-(id<UIViewControllerAnimatedTransitioning>)
						animationControllerForPresentedController:(UIViewController *)presented
						presentingController:(UIViewController *)presenting
						sourceController:(UIViewController *)source
-(id<UIViewControllerAnimatedTransitioning>)
			animationControllerForDismissedController:(UIViewController *)dismissed
-(id<UIViewControllerAnimatedTransitioning>)
			animationControllerForDismissedController:(UIViewController *)dismissed
- Those animation controllers which conform
<UIViewControllerAnimatedTransitioning>protocol are the ones we will use for the custom transitions. To conform<UIViewControllerAnimatedTransitioning>protocol, animation controllers should implement the following methods:
-(NSTimeInterval)transitionDuration:(id<UIViewControllerContextTransitioning>)transitionContext
-(void)animateTransition:(id<UIViewControllerContextTransitioning>)transitionContext
- The key point here; UIKit sends to our animation controller a
transitionContextobject, in which we can find any information about the transition to happen. We are going to usetransitionContextobject to fetch views of both presenting and presented view controllers, calculating final frames, managing lifecycle of transtiion etc. For more details see transitionContext.
Working Example
We will implement this complicated and protocol oriented API, by creating a simple fadein-fadeout transition between 2 view controllers. Let’s assume we have 2 view controllers, HomeViewController and FadeViewController respectively.
For simplicity, HomeViewController would present a FadeViewController instance. Nothing new here except the transitioningDelegate:
UIViewController *fade = [[UIStoryboard storyboardWithName:@"Main" bundle:nil] instantiateViewControllerWithIdentifier:@"fade"];
fade.transitioningDelegate = fade;
[self presentViewController:fade animated:YES completion:nil];
After this step we will implement this delegate in FadeViewController :
@interface FadeViewController : UIViewController <UIViewControllerTransitioningDelegate>

@property (nonatomic,strong) IBOutlet id <UIViewControllerAnimatedTransitioning> presentAnimationController;

@end


@implementation FadeViewController

.
.
.

-(id <UIViewControllerAnimatedTransitioning>)
				animationControllerForPresentedController:(UIViewController *)presented
				presentingController:(UIViewController *)presenting
				sourceController:(UIViewController *)source
{
    return self.presentAnimationController;
}

-(id <UIViewControllerAnimatedTransitioning>) animationControllerForDismissedController:(UIViewController *)dismissed
{
    return nil;
}

@end
UIKit asks our transitionDelegate, which is FadeViewController in our case, whether there is an animationController for preseting this voew controller. We return self.presentAnimationController for presenting transition, and nil for dismissing transition. We do not want to have any custom transition while dismissing FadeViewController.
But what is the self.presentAnimationController property? Where is it initialized?
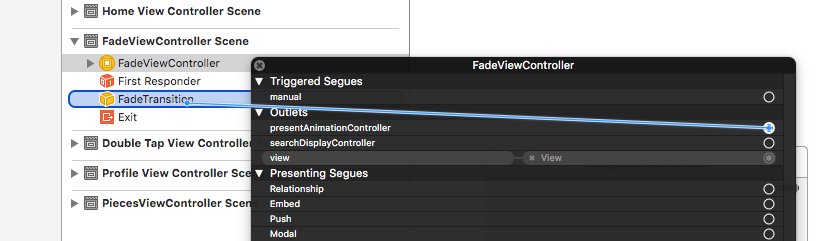
Actually the property self.presentAnimationController is marked as IBOutlet. This means we can specify that property from Storyboard or Interface Builder.
First we create our animation controller. Here is the controller FadeTransition.h:
@interface FadeTransition : NSObject  <UIViewControllerAnimatedTransitioning>

@end
Note that FadeTransition class conforms <UIViewControllerAnimatedTransitioning> which is a requirement to be an animation controller. Finally FadeTransition.m:
@implementation FadeTransition

-(NSTimeInterval)transitionDuration:(id<UIViewControllerContextTransitioning>)transitionContext
{
    return 3.0;
}

-(void)animateTransition:(id<UIViewControllerContextTransitioning>)transitionContext
{
    UIViewController *source = [transitionContext viewControllerForKey:UITransitionContextFromViewControllerKey];
    UIViewController *target = [transitionContext viewControllerForKey:UITransitionContextToViewControllerKey];

    UIView *containerView = [transitionContext containerView];

    CGRect finalFrame     = [transitionContext finalFrameForViewController:target];

    target.view.frame = finalFrame;
    target.view.alpha = 0.0f;
    [containerView addSubview:target.view];

    [UIView animateWithDuration:[self transitionDuration:transitionContext]
                     animations:^{
                         source.view.alpha = 1.0f;
                         target.view.alpha = 1.0f;
                     }
                     completion:^(BOOL finished) {
                         [transitionContext completeTransition:YES];
                     }];
}

@end
As i told before, UIKit send (id<UIViewControllerContextTransitioning>) transitionContext object to our FadeTransition object, therefore we are able to fetch the necessary metadata for the transition. Lets cover it step by step. First we get the 2 views of view controllers:
UIViewController *source = [transitionContext viewControllerForKey:UITransitionContextFromViewControllerKey];
UIViewController *target = [transitionContext viewControllerForKey:UITransitionContextToViewControllerKey];
Then we get the containerView, which was created by UIKit itself temporarily.
UIView *containerView = [transitionContext containerView];
containerView is active and being displayed during the transition. As soon as we finish or cancel the transition, containerView is destroyed by UIKit. We can think containerView as a scene, in which we play any animation we want, and close the scene when the transition ends.
[UIView animateWithDuration:[self transitionDuration:transitionContext]
                     animations:^{
                         source.view.alpha = 1.0f;
                         target.view.alpha = 1.0f;
                     }
                     completion:^(BOOL finished) {
                         [transitionContext completeTransition:YES];
                     }];
This rest of code is just a normal UIViewAnimation.
The only critical point is here, when we call [transitionContext completeTransition:YES],
we tell UIKit that our transition ended. Within that call, UIKit calls the necessary lifecycle methods on both view controllers such as -viewDidDisappear: on HomeViewController, and -viewDidAppear: on FadeViewController.
Here is how i specify the FadeTransition object in Storyboard:
This is how it looks to present using FadeTransition:

Here comes the interesting part. We will use the same transition to dismiss the FadeViewController.
First we create another animation controller for dismiss transition:
@interface FadeViewController : UIViewController <UIViewControllerTransitioningDelegate>
.
.
.
@property (nonatomic,strong) IBOutlet id <UIViewControllerAnimatedTransitioning> dismissAnimationController;

@end
And return this animationController for dismissal:
@implementation FadeViewController

.
.
.
.

-(id<UIViewControllerAnimatedTransitioning>)animationControllerForDismissedController:(UIViewController *)dismissed
{
    return self.dismissAnimationController;
}

@end
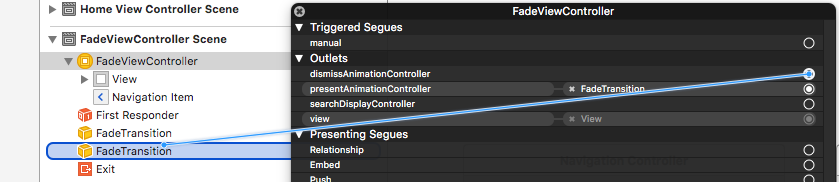
Finally, we attach the new self.dismissAnimationController in Storyboard.
We can create different type of animation controllers and switch them in Storyboard, to see the transition immediately. Here is a couple of transition effects used in the sample project.

Interactive Transitions
We created different type of transitions for both presenting and dismissing a view controller. What about we want to control the transition with user interaction ? Check the following transition:
The presenting animation controller is the one we used in the previous example, FadeTransition. Therefore we can skip the presenting part.
For dismiss transition, we have complicated things a bit. Here is the target view controller called PiecesViewController:
@interface PiecesViewController : UIViewController <UIViewControllerTransitioningDelegate, UINavigationControllerDelegate>

@property (nonatomic,strong) IBOutlet id <UIViewControllerAnimatedTransitioning> presentingTransitionDelegate;
@property (nonatomic,strong) IBOutlet id <UIViewControllerAnimatedTransitioning> dismissingTransitionDelegate;

@end
First, we have our ordinary presenting and dismissing animation controllers. Note that we already set the id <UIViewControllerAnimatedTransitioning> presentingTransitionDelegate to FadeTransition in Storyboard.
The dismiss transition however, we choose to set it in code, in -viewDidLoad method:
@implementation PiecesViewController

-(void)viewDidLoad
{
    [super viewDidLoad];

    PiecesTransition *transition = [PiecesTransition new];
    self.dismissingAnimationController = transition;
}

.
.
.
.


-(id<UIViewControllerAnimatedTransitioning>)animationControllerForDismissedController:(UIViewController *)dismissed
{
    return self.dismissingAnimationController;
}


@end
Lets look at the PiecesTransition class. First the interface:
@interface PiecesTransition : NSObject <UIViewControllerAnimatedTransitioning>

@end
and implementation:
@implementation PiecesTransition


-(NSTimeInterval)transitionDuration:(id<UIViewControllerContextTransitioning>)transitionContext
{
    return 0.7;
}

-(void)animateTransition:(id<UIViewControllerContextTransitioning>)transitionContext
{
    PiecesViewController *source = [transitionContext viewControllerForKey:UITransitionContextFromViewControllerKey];
    UIViewController *target = [transitionContext viewControllerForKey:UITransitionContextToViewControllerKey];

    UIView *containerView = [transitionContext containerView];

    UIView *view1 = [source.view viewWithTag:1];
    UIView *view2 = [source.view viewWithTag:2];
    UIView *view3 = [source.view viewWithTag:3];
    UIView *view4 = [source.view viewWithTag:4];

    NSArray *views  = [NSArray arrayWithObjects:view1,view2,view3,view4, nil];

    CGFloat distance = 140.0;

    NSArray *targetFrames = [NSArray arrayWithObjects:[NSValue valueWithCGRect:CGRectOffset(view1.frame, -distance, -distance)],
                       [NSValue valueWithCGRect:CGRectOffset(view2.frame, distance, -distance)],
                       [NSValue valueWithCGRect:CGRectOffset(view3.frame, -distance, distance)],
                       [NSValue valueWithCGRect:CGRectOffset(view4.frame, distance, distance)],nil];


    [containerView insertSubview:target.view belowSubview:source.view];

    [UIView animateWithDuration:[self transitionDuration:transitionContext]
                          delay:0.0
                        options:UIViewAnimationOptionCurveEaseIn
                     animations:^{

                         for (NSInteger index = 0; index < views.count; index++) {

                             UIView *view = views[index];
                             CGRect frame = [targetFrames[index] CGRectValue];
                             view.frame = frame;
                         }

                         source.view.alpha = 0.0f;

                     } completion:^(BOOL finished) {

                         if (![transitionContext transitionWasCancelled]) {
                            [source.view removeFromSuperview];
                            [transitionContext completeTransition:YES];
                         }
                         else
                         {
                             [target.view removeFromSuperview];
                             [transitionContext completeTransition:NO];
                         }

                     }];
}

@end
Let’s discuss the code above in parts.
-
First we will get the views of view controllers as always. We also know that the source view controller is a PiecesViewController, therefore we will get the coloured views with their tags.
- After that we calculate the frames for each subview and animate to their final position
- When the animation finishes, we call completeTransition: to inform UIKit to complete the lifecycle of the view controller.
When we build and run the project, we will see the new PieceTransition, but we immediately aware of that the transition is not interactive. We can only dismiss the view controller by clicking « Dismiss button down.
Making the transition interactive
We have the dismiss transition working, but we also want to manage the transition via users interactions such as tap, swipe etc. In our example we will try to manage the transition with Pan gesture.
First we should tell UIKit that this view controller has an interactionController. This is done by overriding the transitionDelegate method in PiecesViewController:
-(id<UIViewControllerInteractiveTransitioning>)interactionControllerForDismissal:
												(id<UIViewControllerAnimatedTransitioning>)animator
Here is the view controller implementation:
@interface PiecesViewController : UIViewController <UIViewControllerTransitioningDelegate, UINavigationControllerDelegate>

@property (nonatomic,strong) IBOutlet id <UIViewControllerAnimatedTransitioning> presentingAnimationController;
@property (nonatomic,strong) IBOutlet id <UIViewControllerAnimatedTransitioning> dismissingAnimationController;

// new interaction controller
@property (nonatomic,strong) id <UIViewControllerInteractiveTransitioning> dismissingInteractionController;

@end


@implementation PiecesViewController

.
.
.
.

-(id<UIViewControllerInteractiveTransitioning>)interactionControllerForDismissal:(id<UIViewControllerAnimatedTransitioning>)animator
{
    return dismissingInteractionController;
}

@end
Note that the property dismissingInteractionController conforms the protocol <UIViewControllerInteractiveTransitioning>.
Now we need to create that interactionController, here is PiecesInteraction:
@interface PiecesInteraction : UIPercentDrivenInteractiveTransition

@property (nonatomic,weak) UIViewController *viewController;
@property (nonatomic,strong) NSValue *initialPoint;

-(void)setupViewController:(UIViewController *)viewController;

@end

 ```

`PiecesInteraction` object inherits from `UIPercentDrivenInteractiveTransition` which conforms `<UIViewControllerInteractiveTransitioning>` behind the scene. Therefore any instances of `UIPercentDrivenInteractiveTransition` can be used as an interaction controller.

The interaction controllers will manage the transition with the **Pan** gesture. We might first catch those gestures:

```objective_c
@implementation PiecesInteraction

-(void)setupViewController:(UIViewController *)viewController
{
    UIPanGestureRecognizer *gesture = [[UIPanGestureRecognizer alloc] initWithTarget:self
                                                                              action:@selector(pan:)];

    [viewController.view addGestureRecognizer:gesture];
    self.viewController = viewController;

}

-(void)pan:(UIPanGestureRecognizer *)gesture
{

    switch (gesture.state) {
        case UIGestureRecognizerStateBegan;
            break;

        case UIGestureRecognizerStateChanged:

            break;

        case UIGestureRecognizerStateEnded:
        case UIGestureRecognizerStateCancelled:

            break;

        default:

            break;
    }
}
We are listening for pan gestures of the view controller. We need to call -(void)setupViewController: :
@implementation PiecesViewController

-(void)viewDidLoad
{
    [super viewDidLoad];

    .
    .
    .

    for (UIGestureRecognizer *gesture  in [self.view gestureRecognizers]) {
        [self.view removeGestureRecognizer:gesture];
    }

    PiecesInteraction *interaction = [PiecesInteraction new];
    [interaction setupViewController:self];
    self.dismissingInteractionController = interaction;
}
.
.
.
@end
In the code above, we initialised an instance of PiecesInteraction, set the pan gesture for the view controller and finally set it as interaction controller for dismiss transition.
We are all set to adjust the dismiss transition with out touch events. Lets manage the animation with the gesture event results:
-(void)pan:(UIPanGestureRecognizer *)gesture
{
    CGPoint location = [gesture locationInView:self.viewController.view];
    float delta = (float)(location.x - self.initialPoint.CGPointValue.x) / 150.0 ;
    delta = fabsf(delta);

    switch (gesture.state) {
        case UIGestureRecognizerStateBegan:

            [self.viewController dismissViewControllerAnimated:YES
                                                    completion:NULL];

            self.initialPoint = [NSValue valueWithCGPoint:location];
            break;

            .
            .
    }
    .
    .
}
- First we get the location in whole screen. At the first touch, we store the location inside
initialPoint. - We will start to dismiss the view controller, which triggers the dismiss transition.
–
-(void)pan:(UIPanGestureRecognizer *)gesture
{
    .
    .

    switch (gesture.state) {
            .
            .
       case UIGestureRecognizerStateChanged:

            delta = fmaxf(delta, 0.0);
            delta = fminf(delta, 1.0);

            [self updateInteractiveTransition:delta];

            break;
            .
            .
    }
    .
    .
}
- While moving the touch,
-pan:method will be called continously, with stateUIGestureRecognizerStateChanged. we calculated how much we move our finger on thex-axis. Whiledeltais guaranteed to be[0,1], we are going to update our transition with thedeltaproportionally.
-(void)pan:(UIPanGestureRecognizer *)gesture
{
    switch (gesture.state) {
        case UIGestureRecognizerStateEnded:
        case UIGestureRecognizerStateCancelled:

            if (gesture.state == UIGestureRecognizerStateCancelled || delta < 0.7) {
                [self cancelInteractiveTransition];
            }
            else
            {
                [self finishInteractiveTransition];
            }

            self.initialPoint = nil;

            break;

        default:
            break;
    }
}
- Finally when the gesture ends, we will check the
delta. In our case, to complete the dismiss transition, we should have move our finger at least %70 of the whole transition. If not the transition is not completed then we call-cancelInteractiveTransitionmethod. If we moved the finger enough we will call-finishInteractiveTransition. - Note that the methods
-updateInteractiveTransition:,-cancelInteractiveTransitionand-finishInteractiveTransitionare methods of the protocol<UIViewControllerInteractiveTransitioning>. We already have that protocol because we haveUIPercentDrivenInteractiveTransitionas superclass, remember ?
Here is the result with interaction:
Summary
We have completed basics of UIViewControllerTransioning API. Transitions possibilities are endless with the new API and you can create and attach transitions to different view controllers with no change. Here is the complete source code for the project. Note that the project contains more than the transitions and implementations we discussed here.